In Bintray, once a file is published, it cannot be deleted or modified after 5 days. And a published version cannot be deleted after 30 days according to their user guide.
This is why I first thought I cannot use Bintray to host my Eclipse plugin because some files in p2 repository (artifacts.jar, content.jar) must be overwritten when releasing a new version of a plugin.
But after asking their support, it turned out that Bintray supports the p2 repository file structure and can be used for an Update Site of Eclipse Plugins.
There are three things you need to know.- Your plugin must be open-source.
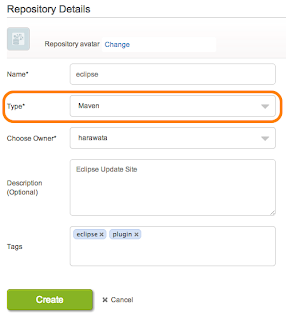
- Choose Maven as the repository type.
- Use Bintray's REST API to upload the files that needs to be overwritten.
If you have some experiences with Bintray, you probably do not need to read the following lengthy explanation.
Create a new Repository.

At first, you need to create a new repository.
- Name can be any string. It will be a part of your update site URL.
- Type must be Maven.
I should also mention that Name and Type cannot be changed once the repository is created.
Create a new Package.
A Package represents a group of files.
For Eclipse Plugins, it may corresponds to the category of plugins.
There would be nothing difficult in the Package setting and all the settings including the package name can be modified afterwards.
Create a new version.
The version of my plugin is 1.0.8, so I created a new Version with name '1.0.8'.
After saving the new version, you need to click Cancel or the version number link to move to the Version page.
Upload files using Bintray's REST API.
In the root directory of my plugin update site, there are two JARs and two directories.
And as I explained, artifacts.jar and content.jar must be uploaded via Bintray's REST API.
The files in the subdirectories (features and plugins) can be uploaded using Bintray's File Upload UI.
To use the REST API, you need an API Key which is automatically generated when you created your account.
Here are the steps to find your API Key:
- Click your account name link at the top of the screen.
- Click Edit.
- Click API Key and copy the string into your clipboard.
You should check the latest API info on their site, but as an example, here is the curl command that I used to upload artifacts.jar (replace MY_API_KEY with your API Key).
Note that the artifacts.jar and content.jar uploaded using the REST API are not listed on the Files tab of the Version page because Bintray recognize them as metadata and stores them differently from normal files (that's how we can overwrite them after published).
You will find Publish link on the Version page.
The URL of the Update Site may be displayed on the upper right of the screen.
You need to...
$ curl -X PUT -u harawata:MY_API_KEY --data-binary @artifacts.jar https://api.bintray.com/content/harawata/eclipse/stlipse/1.0.8/artifacts.jar
Note that the artifacts.jar and content.jar uploaded using the REST API are not listed on the Files tab of the Version page because Bintray recognize them as metadata and stores them differently from normal files (that's how we can overwrite them after published).
Publish the version and verify using Eclipse.
Once all the files are uploaded you need to 'Publish' the version to allow p2 client (i.e. Eclipse) to access your Update Site.You will find Publish link on the Version page.
The URL of the Update Site may be displayed on the upper right of the screen.
Release a new version of the plugin.
It is pretty straightforward to release an updated version of your plugin.You need to...
- Create a new Version.
- Upload artifacts.jar and content.jar using REST API. Existing files will be overwritten.
- Upload JARs newly added to features and plugins directories.
- Publish the new Version.
Here is my Bintray repository:
And the Update Site URL is:

No comments:
Post a Comment